Event Registration Checklist: Everything You Need
Running event registration well means getting dozens of small details right. Miss one—like forgetting to test your badge printer the night before—and you end up with a bottleneck at the door while 500 attendees wait in line.
This checklist breaks the entire registration process into five phases, from early planning through post-event wrap-up. Whether you're managing a 50-person workshop or a 5,000-person conference, the fundamentals are the same. Print it, share it with your team, and check items off as you go.
Pre-Event Planning (4-8 Weeks Out)
This is your foundation phase. The decisions you make here determine how smooth (or painful) everything downstream will be.
Registration Page Setup
- Choose your registration platform. Whether you use Cvent, Eventbrite, Whova, or a custom form, lock this in early. Your choice affects data format, payment processing, and integration options later.
- Define your registration fields. At minimum, collect: full name, email address, company/organization, and job title. Resist the urge to add 15 custom fields—every extra field reduces completion rates by 3-5%.
- Set up ticket types or categories. VIP, general admission, speaker, exhibitor, press—define these now. They affect badge design, access levels, and reporting later.
- Configure confirmation emails. Every registrant should receive an immediate confirmation with: event date/time/location, a QR code or confirmation number for check-in, parking or transit information, and a calendar invite (.ics file).
- Test the registration flow end-to-end. Register as a test attendee. Did the confirmation email arrive? Is the QR code scannable? Does the data appear correctly in your admin dashboard?
Payment Processing (If Applicable)
- Connect your payment gateway. Stripe, PayPal, or your platform's built-in processor. Test a real transaction (you can refund it) to verify funds arrive in the correct account.
- Set up discount codes and group rates before sharing the registration link. Adding them after people have already registered creates confusion.
- Configure refund and cancellation policies. Display these clearly on the registration page. A common approach: full refund until 2 weeks before, 50% until 1 week before, no refunds after that.
Staffing and Roles
- Assign a registration lead. One person owns the entire check-in process. They're the decision-maker when something goes wrong on-site.
- Estimate staff needed at the door. A good rule of thumb: 1 staff member per check-in station, plus 1 floating troubleshooter per 3 stations. For manual check-in, each station processes roughly 60-80 people per hour. Self-service kiosks can handle about 100 per hour with less staff.
Tech Setup (2-4 Weeks Out)
This is where your on-site experience takes shape. The check-in method you choose affects speed, cost, and the attendee's first impression of your event.
Choose Your Check-In Method
You have three main options:
- Paper lists. Cheapest option. Works for events under 50 people. Slow, error-prone, and produces no real-time data. Only use this as an absolute last resort or backup.
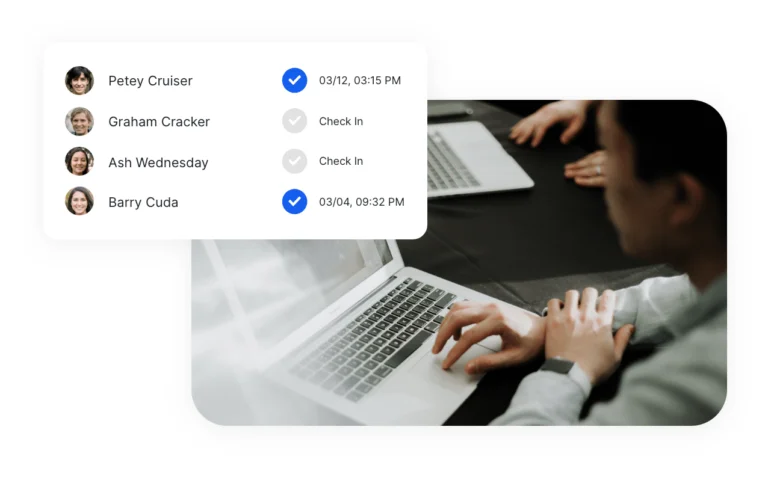
- Staff-operated devices. A team member with a tablet or phone scans QR codes or searches names. Good for events of 50-1,000 attendees. Apps like Micepad let staff scan QR codes for instant check-in.
- Self-service kiosks. Attendees check themselves in by scanning their QR code or searching their name on a tablet. Best for high-volume events (500+). Reduces staff needs and speeds up throughput.
Hardware Decisions
- Devices: iPads are the standard for event check-in. Budget 1 device per check-in point, plus 1-2 spares. Make sure all devices are running the same OS version and app version.
- Badge printers: If you're printing badges on-site, choose your printer now and order supplies (badge stock, lanyards, ribbons). Common choices include the Zebra ZD421 (compact, reliable) and Brother QL-820NWB (wireless, fast). Order 20% more badge stock than your expected attendee count.
- Stands and mounts: For kiosk-style setups, you need iPad floor stands or tabletop mounts. Floor stands are more visible; tabletop mounts save space.
- Power and networking: Count your power outlets at the venue. You'll need one per device, one per printer, and ideally a dedicated WiFi network or cellular hotspot as backup.
Badge Design
- Keep it readable from 3-4 feet away. Name in 24pt+ font, company in 18pt+. Attendee type (VIP, Speaker, etc.) should be color-coded or clearly labeled.
- Include a scannable QR code on the badge if you plan to use lead capture at the event. This lets exhibitors scan badges instead of collecting business cards.
- Print test badges now. Don't wait until setup day. Print 5-10 samples to check alignment, readability, and color accuracy.
Software Configuration
- Import your attendee list. Export a CSV from your registration platform and import it into your check-in app. In Micepad, this takes about 2 minutes—upload the file, map the columns (name, email, company, ticket type), and confirm.
- Configure check-in settings: duplicate check-in alerts, walk-in registration (allow or block), and which fields display on the check-in screen.
- Set up offline mode. If your venue has unreliable WiFi, make sure your check-in app supports offline mode. Micepad caches the full attendee list locally, so check-in works even without internet—data syncs when connectivity returns.
Week-of Preparation
Registration is likely still open. New registrations are coming in. This is your final prep window.
Final Data Sync
- Do a fresh export from your registration platform and re-import into your check-in system. If you imported 2 weeks ago, you've likely gained new registrants since then.
- Reconcile your numbers. Registration platform count should match check-in app count. If they don't, investigate before event day.
- Flag VIPs and special attendees. Speakers, sponsors, press—these people should be easy to identify in your check-in system so staff can provide appropriate attention.
Device and Printer Prep
- Charge all devices to 100%. Even if you'll have power on-site, start fully charged.
- Update and test the check-in app on every device. Open the app, search for a test name, scan a test QR code.
- Load badge stock into printers and print 10 test badges. Check alignment. Adjust if needed. Pack extra rolls of badge stock and extra printer ribbons.
- Label all equipment. Put your organization's name on every iPad, printer, cable, and stand. Equipment gets mixed up at venues.
Signage and Wayfinding
- Print directional signage: "Registration This Way" with arrows, placed at the venue entrance, elevator lobbies, and hallway intersections.
- Prepare station signs: "Self Check-In" for kiosks, "A-L" and "M-Z" if splitting alphabetically, "Speakers & VIP" for priority lanes.
- Print a large QR code poster for walk-in registration, if you're allowing day-of signups.
Day-of Checklist
Arrive at least 90 minutes before doors open. Two hours is better for events over 500 attendees.
Setup (90-120 Minutes Before Doors)
- Set up tables and check-in stations at the designated area. Position them where attendees will naturally flow from the entrance—don't make people search for registration.
- Connect devices to power and network. Test WiFi speed. If it's under 5 Mbps or unreliable, switch to a cellular hotspot or confirm offline mode is enabled.
- Turn on and test every device. Open the check-in app, scan a test QR code, print a test badge. Do this for every single station, not just one.
- Place signage. Walk the path from the building entrance to registration and place signs at every decision point.
Staff Briefing (30-45 Minutes Before Doors)
- Walk all staff through the check-in process: how to scan a QR code, how to search by name, how to handle walk-ins, how to reprint a badge.
- Assign escalation procedures. "If someone isn't in the system, don't turn them away—flag a manager." Define who the on-site decision-maker is.
- Distribute radios or set up a group chat so registration staff can communicate without leaving their stations.
Test Run (15 Minutes Before Doors)
- Run 3-5 staff members through the full check-in process as if they were attendees. Time it. Each check-in should take under 15 seconds with QR scanning, under 30 seconds with name search.
- Verify badge printing is working from every station that connects to a printer.
- Confirm your backup plan. If the app crashes, do you have a printed attendee list? If the printer jams, do you have pre-printed generic badges? If WiFi dies, is offline mode active?
During the Event
- Monitor check-in volume in real time. Most check-in apps (including Micepad) show a live dashboard. If one station has a long queue, redirect attendees to a less busy station.
- Keep badge stock replenished. Assign someone to monitor printer supplies every 30 minutes during peak check-in (typically the first 60-90 minutes).
- Document issues as they happen. "Printer 2 jammed at 9:15am" or "WiFi dropped for 3 minutes at 10:00am."—this helps with post-event improvements.
Post-Event Follow-Up
The event is over, but your registration work isn't. The data you collected is valuable—use it.
Attendance Reports
- Export your final check-in data within 24 hours. This includes: total checked-in vs. registered, check-in times (useful for understanding arrival patterns), no-show list, and walk-in registrations.
- Calculate your show rate. Industry average is 60-70% for free events and 85-95% for paid events. If yours is significantly lower, investigate why.
- Share attendance data with stakeholders. Sponsors want to know how many people attended. Your finance team needs final numbers. Your marketing team wants the attendee list for follow-up.
No-Show Follow-Up
- Send a "sorry we missed you" email within 48 hours. Include a link to session recordings (if available), slides, or a summary of key takeaways. This turns a no-show into a touchpoint.
- Analyze no-show patterns. Were most no-shows from a specific ticket type? A specific registration date? This data improves future forecasting.
Feedback Collection
- Send a post-event survey within 24-48 hours while the experience is fresh. Include 1-2 questions about the check-in experience: "How would you rate the registration/check-in process?" and "Did you experience any delays at check-in?"
- Debrief with your registration staff. What worked? What didn't? What would they change? Their on-the-ground perspective is invaluable.
Common Mistakes to Avoid
After working with hundreds of events, these are the mistakes we see most often:
- Not testing badge printing until event day. Printers need driver installation, calibration, and test prints. This takes 30-60 minutes the first time. Don't discover this at 7am on event day.
- Relying solely on venue WiFi. Venue WiFi is shared with attendees, exhibitors, and AV equipment. It will be slower than expected. Always have a backup: cellular hotspot or offline mode.
- No backup plan for check-in. If your app crashes, can you still check people in? Keep a printed PDF of your attendee list and a box of blank pre-printed badges as emergency backup.
- Under-staffing the first hour. 60-70% of attendees arrive in the first 60-90 minutes. Staff for peak volume, not average volume.
- Forgetting to re-sync the attendee list. If you imported your list 3 weeks ago and haven't updated it, anyone who registered in the last 3 weeks won't be in the system.
- Collecting too much data at check-in. The registration desk is not the place to ask 5 survey questions. Check-in should take under 15 seconds. Collect additional data via a post-event survey.
Printable Checklist Summary
Use this condensed checklist as a quick reference. Print it and check off items as you complete them.
| Phase | Task | Done |
|---|---|---|
| 4-8 Weeks Out | Registration page live and tested | |
| Confirmation emails configured with QR codes | ||
| Payment processing tested (if applicable) | ||
| Registration lead assigned | ||
| Staffing plan drafted | ||
| 2-4 Weeks Out | Check-in method chosen (manual / kiosk / self-service) | |
| Devices and printers ordered or confirmed | ||
| Badge design finalized and test-printed | ||
| Attendee list imported into check-in app | ||
| Offline mode tested | ||
| Week Of | Fresh attendee list export and re-import | |
| All devices updated, charged, and tested | ||
| Badge stock loaded, 10 test badges printed | ||
| Signage printed | ||
| Equipment labeled | ||
| Day Of | Arrive 90+ minutes early | |
| All stations set up, powered, connected | ||
| Staff briefing completed | ||
| Full test run (scan, search, print) at every station | ||
| Backup plan confirmed (printed list, spare badges) | ||
| Post-Event | Attendance report exported | |
| No-show follow-up email sent | ||
| Post-event survey sent | ||
| Staff debrief completed |
A well-executed check-in process sets the tone for the entire event. When attendees walk through the door and get their badge in under 15 seconds, they start the event in a positive frame of mind. When they wait in a 20-minute line, that frustration carries into the first session. The difference between these two outcomes is preparation—and this checklist gives you the structure to get it right every time.
Micepad Team
Micepad - Enterprise Event Management Software