Event Kiosk Setup Guide: Self-Service Check-In That Works
Self-service kiosks have become the default check-in method for events over 200 attendees. The math is straightforward: a staffed check-in desk processes 60–80 people per hour per station and requires a trained operator. A self-service kiosk processes roughly 100 per hour and needs only occasional monitoring. For a 1,000-person conference, that's the difference between hiring 8 registration staff and hiring 2.
This guide covers everything you need to set up self-service event kiosks—from hardware selection through day-of troubleshooting. Whether you're deploying 2 kiosks for a corporate meeting or 20 for a tradeshow, the principles are the same.
What Is a Self-Service Event Kiosk?
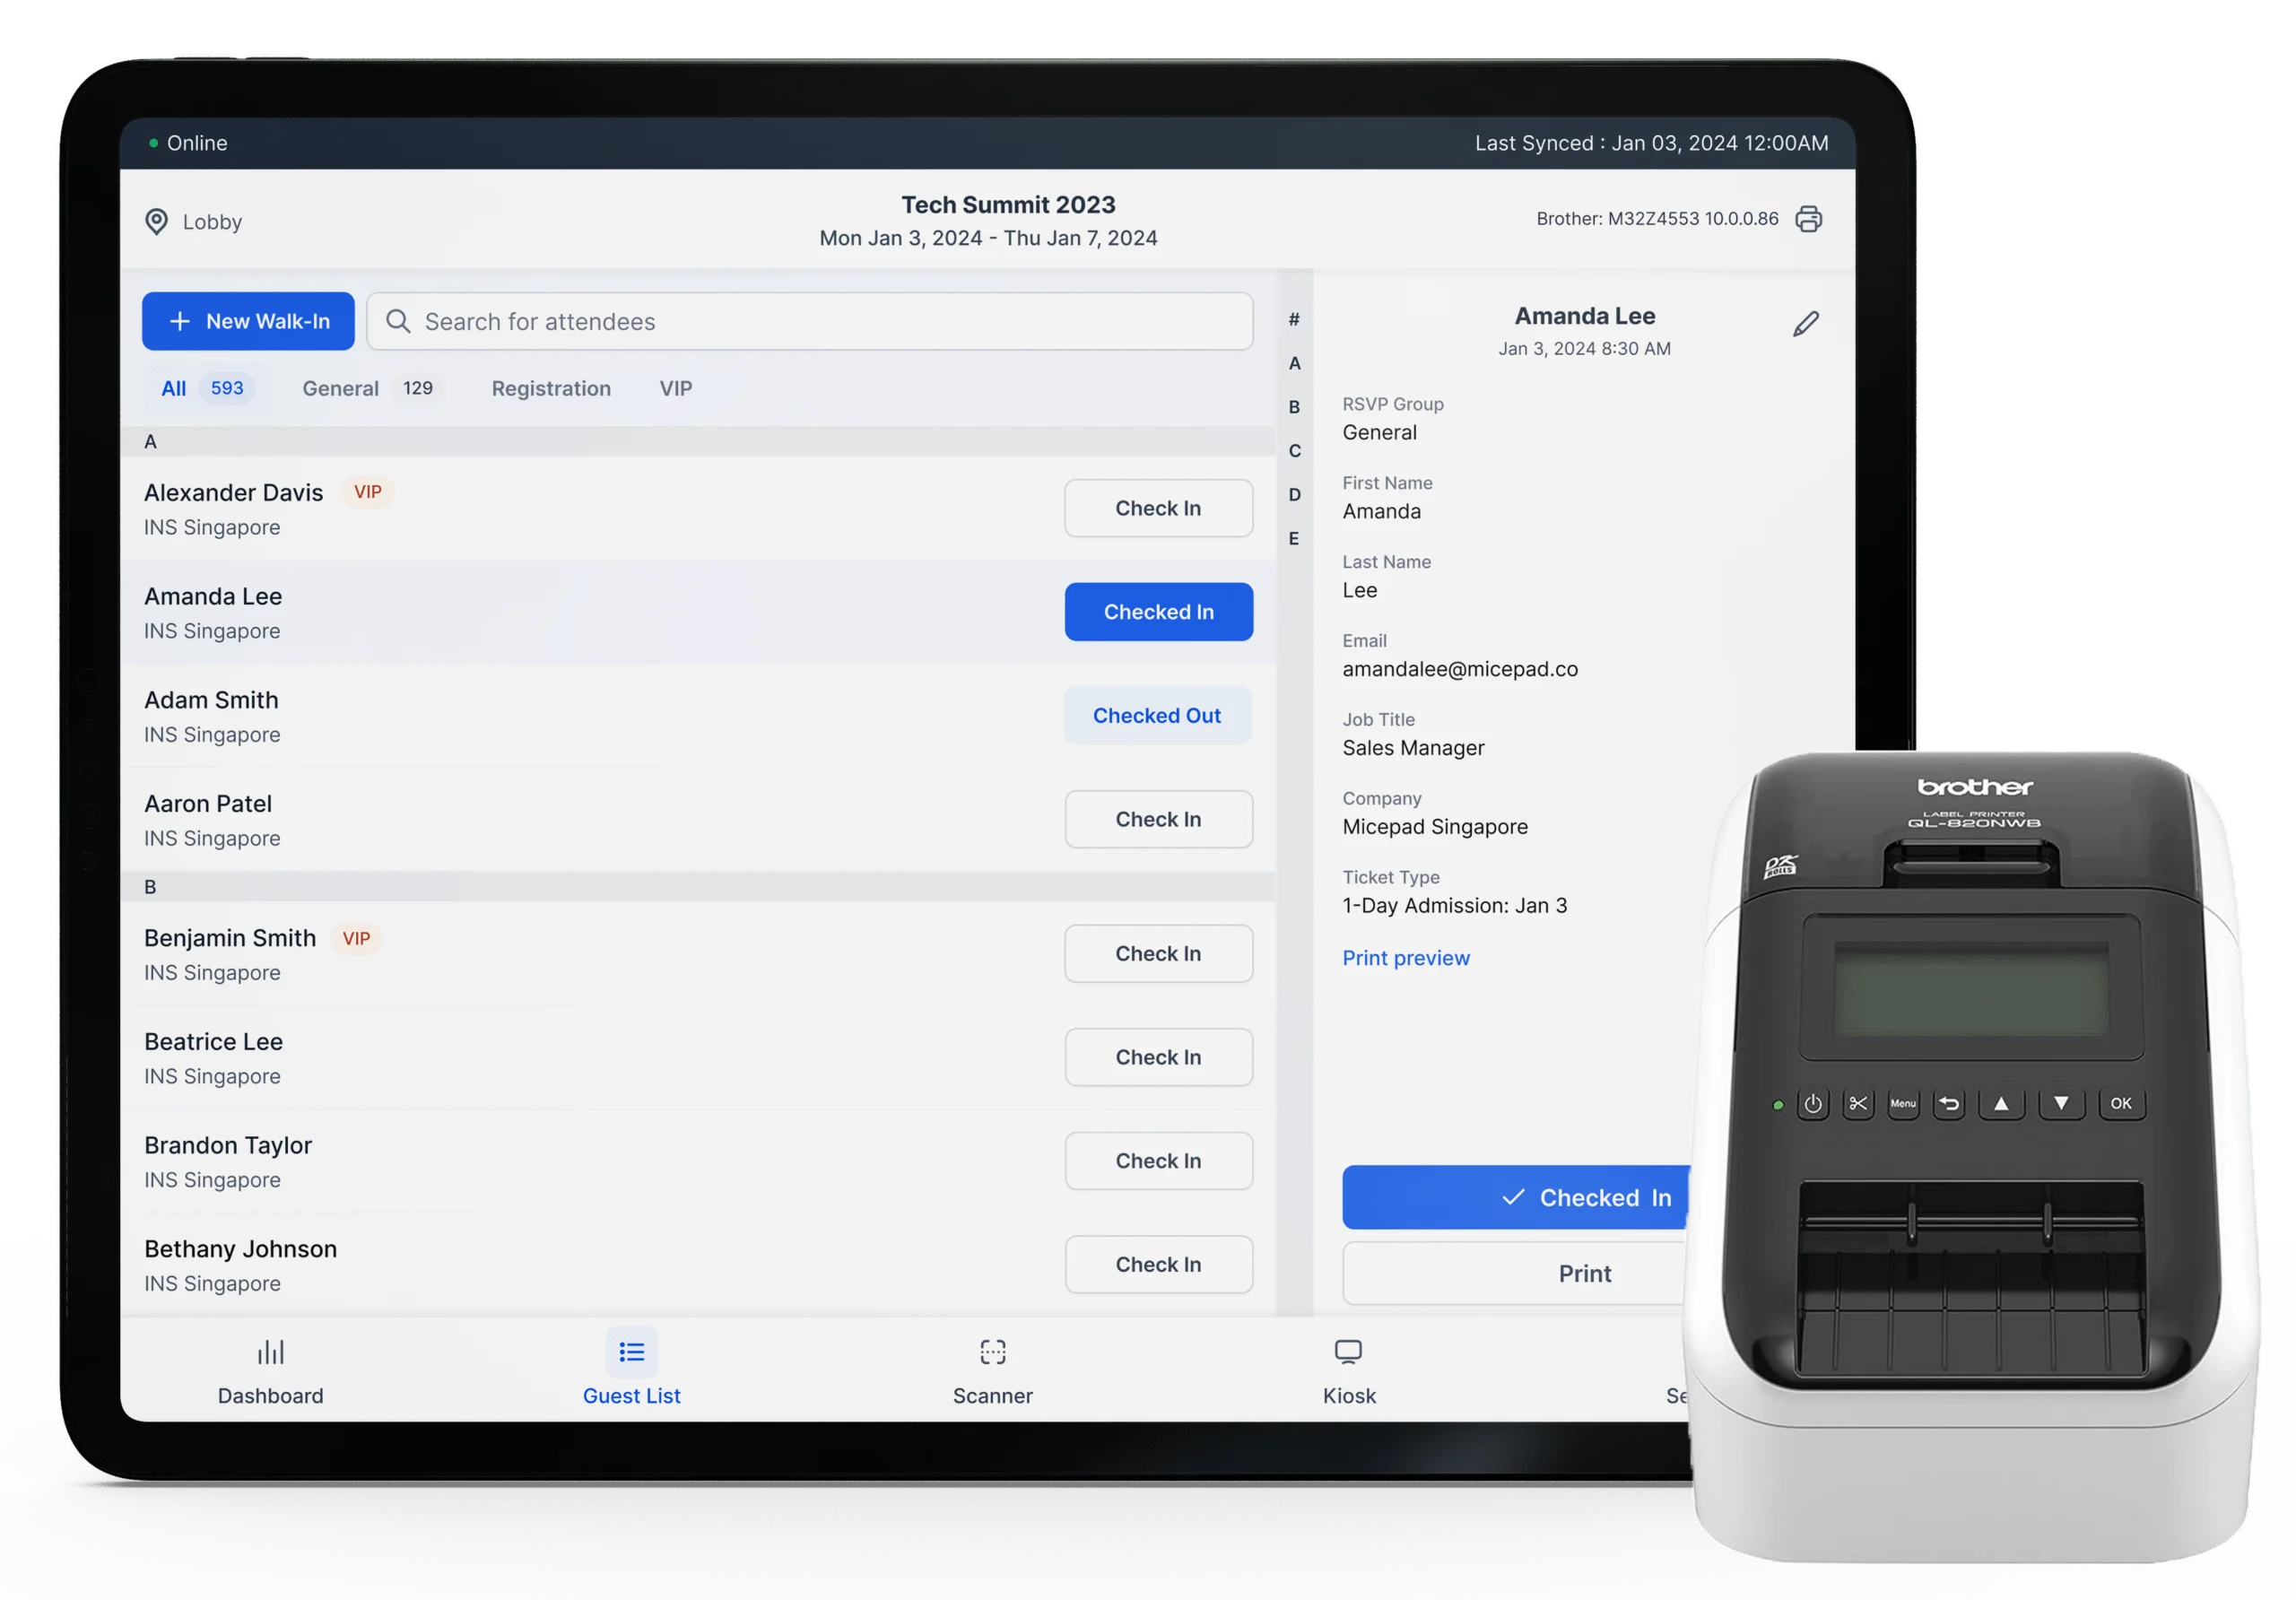
A self-service event kiosk is a tablet or touchscreen device, mounted on a stand, running check-in software in a locked-down mode. Attendees walk up, identify themselves (by scanning a QR code, typing their name, or searching a list), and the kiosk confirms their check-in—optionally triggering a badge to print from a connected printer.
The key difference from a staffed station: no one stands behind the kiosk. An attendee does the entire process themselves in 10–15 seconds. Staff are nearby to help with issues, but they're not required for every single check-in.
Kiosks work well when:
- Your event has 200+ attendees (the efficiency gains become meaningful)
- Most attendees have pre-registered and have a QR code
- You want to reduce staffing costs
- You want to create a modern, professional first impression
Kiosks work less well when:
- Most attendees are walk-ins without pre-registration
- Your audience skews older and may be less comfortable with touchscreens
- The venue has no power or connectivity at the entrance
Hardware Options
You have three main approaches, each with different cost and complexity trade-offs.
Option 1: iPad on a Stand
The most common setup. An iPad (10th generation or newer, or iPad Air) mounted on a floor stand or tabletop stand, running a check-in app like Micepad.
- Cost: $350–$500 per iPad + $80–$300 per stand
- Pros: Familiar interface, lightweight, easy to transport, widely available for rental
- Cons: Needs a case and stand, screen is smaller (10.9"), can be accidentally dislodged
- Best for: Most events. This is the standard for a reason.
Option 2: Dedicated Kiosk Hardware
Purpose-built kiosk enclosures with larger screens (15–22"), integrated printers, and ruggedized housings. Companies like Elo and Advantech make these.
- Cost: $2,000–$5,000+ per unit
- Pros: Professional appearance, larger screen, tamper-resistant, often includes built-in printer
- Cons: Heavy (30–50 lbs), expensive, requires custom software integration
- Best for: Permanent installations, high-end corporate events, venues that use them repeatedly
Option 3: Micepad SmartKiosk
A purpose-built event kiosk designed specifically for check-in and badge printing. The SmartKiosk integrates an iPad mount with a built-in badge printer slot in a single compact unit. It's designed to be shipped to events, set up in minutes, and reused.
- Cost: Available through Micepad's event packages
- Pros: All-in-one design (no separate printer table needed), professional appearance, quick setup, printer and iPad in one unit, designed for event portability
- Cons: Tied to the Micepad platform
- Best for: Events that want a polished kiosk experience without assembling separate components
Choosing the Right iPad Stand
If you go the iPad route (which most events do), the stand matters more than you'd think. A wobbly stand frustrates users. A stand at the wrong height forces people to bend awkwardly.
Floor Stands
Free-standing units that position the iPad at roughly chest height (typically adjustable between 40–48 inches).
- Advantages: Highly visible from across the room, clearly signals "check in here," accommodates wheelchair users if height-adjustable, no table required
- Disadvantages: Takes up more floor space, can be knocked over if not weighted properly, harder to transport (larger/heavier)
- Recommended brands: CTA Digital, Heckler Design, Lilitab
- Key features to look for: Weighted base (at least 10 lbs), cable management channel in the pole, locking enclosure so the iPad can't be removed, tilt and swivel adjustment
Tabletop Stands
Compact mounts that sit on a registration table, angling the iPad toward the user.
- Advantages: Compact, lightweight, easy to transport, cheaper ($30–$100), you can place multiple on one table
- Disadvantages: Requires a table, less visible from a distance, iPad can potentially be lifted with the stand
- Recommended brands: Heckler WindFall, AboveTEK, Lamicall
- Key features to look for: Anti-theft mounting (bolt-through-table option or cable lock), angle adjustment (45–70 degrees is the usable range), rubber feet to prevent sliding
Which to Choose?
Use floor stands when: you don't have registration tables, you want kiosks to be the first thing attendees see, or your venue has a wide open foyer. Use tabletop stands when: you already have a registration desk, space is tight, or you need to ship/transport the equipment easily.
Pairing with a Badge Printer
On-demand badge printing transforms the kiosk from a check-in point into a complete registration station. The attendee scans their QR code, the kiosk confirms check-in, and a personalized badge prints within 3–5 seconds.
Recommended Printers
| Printer | Type | Connection | Badge Size | Best For |
|---|---|---|---|---|
| Zebra ZD421 | Thermal transfer | USB, WiFi, Bluetooth | Up to 4" wide | Compact setups, standard badges |
| Zebra ZD621 | Thermal transfer | USB, WiFi, Bluetooth, Ethernet | Up to 4" wide | High-volume events, faster print speed |
| Brother QL-820NWB | Direct thermal | USB, WiFi, Bluetooth | Up to 2.4" wide | Name labels, smaller badges |
| Brother QL-1110NWB | Direct thermal | USB, WiFi, Bluetooth | Up to 4" wide | Full-size badges, no ribbon needed |
Printer Placement Tips
- Place the printer within arm's reach of the kiosk—ideally on the same table or integrated into the kiosk unit. The attendee should be able to grab their badge without walking to a separate station.
- Position the output tray facing the attendee, not facing the wall. This seems obvious, but it's a common setup mistake.
- Keep the printer at table height or slightly below. Attendees will look down to grab their badge naturally.
- Leave space behind the printer for an operator to reload badge stock. Someone will need to swap rolls or clear jams. If the printer is pushed against a wall, this becomes difficult.
- Use wireless printing when possible. Bluetooth or WiFi connections eliminate cable clutter between the iPad and printer. Micepad supports wireless printing to all four printers listed above.
Network Setup
Connectivity is the single most common point of failure for event kiosks. Plan for it carefully.
Option 1: Venue WiFi
- Pros: Already there, no extra cost
- Cons: Shared with hundreds or thousands of attendees, often throttled, may require a captive portal login that breaks kiosk mode
- Recommendation: Ask the venue for a dedicated SSID for registration devices, separate from the attendee network. Many venues offer this for $200–$500. It's worth it.
Option 2: Cellular Hotspot
- Pros: Independent of venue infrastructure, you control it, portable
- Cons: Signal varies by venue (basement conference rooms are trouble), data caps on some plans, latency can be higher
- Recommendation: Bring a dedicated hotspot device (not phone tethering—phones overheat and drop connections). A device like the Netgear Nighthawk M6 supports 30+ connected devices. Test it at the venue in advance if possible.
Option 3: Offline Mode
- Pros: Zero dependency on network, works everywhere, no latency
- Cons: Data syncs only when connectivity returns, can't pull real-time registration updates
- Recommendation: Always configure offline mode as a backup, even if you plan to use WiFi or cellular. In Micepad, offline mode is enabled by default—the full attendee list is cached on the device, and check-ins sync when the connection is restored. This means even a complete network outage won't stop check-in.
The best approach: Use venue WiFi or a cellular hotspot as your primary connection, and configure offline mode as your automatic fallback. This way, check-in continues without interruption regardless of network conditions.
Kiosk Mode Setup
"Kiosk mode" means locking the device so attendees can only interact with the check-in app. Without it, someone will inevitably press the home button, open Safari, or change the device settings.
iPad Guided Access (Built-In)
Apple's built-in kiosk mode. Free and simple.
- Open Settings > Accessibility > Guided Access and toggle it on
- Set a passcode (your staff will need this to exit Guided Access)
- Open the Micepad app
- Triple-click the side button to start Guided Access
- Optionally disable specific screen regions (e.g., disable the area where a status bar appears)
- Tap "Start" in the top-right corner
The iPad is now locked to the check-in app. The home button, swipe gestures, and notifications are all disabled. To exit, triple-click the side button and enter your passcode.
Limitations: Guided Access doesn't survive a device restart—if the iPad reboots, you'll need to re-enter the passcode and re-enable it. It also doesn't prevent the screen from dimming, so set Auto-Lock to "Never" in Settings > Display & Brightness.
Micepad Kiosk Mode
Micepad has a built-in kiosk mode designed specifically for event check-in. When enabled, the app locks into a full-screen check-in interface optimized for attendee self-service. The interface shows large, clear buttons and text, hides admin controls, and automatically returns to the search/scan screen after each check-in (with a configurable timeout). This works alongside iPad Guided Access for a fully locked-down kiosk experience.
Screen Settings to Configure
- Auto-Lock: Never. The screen should never go dark during the event.
- Brightness: 80–100%. Venues are often brightly lit; a dim screen is hard to read.
- Auto-Brightness: Off. You want consistent brightness regardless of ambient light changes.
- Do Not Disturb: On. No notifications should appear on a kiosk screen.
- Sound: Off or minimal. A subtle confirmation sound is fine. A loud notification chime every check-in will annoy nearby staff.
How Many Kiosks Do You Need?
The answer depends on three variables: total attendees, arrival window, and acceptable wait time.
Throughput Math
A self-service kiosk with QR code scanning processes approximately 100 check-ins per hour (about 35–40 seconds per attendee including walking up, scanning, grabbing a badge, and clearing the station). Name-search check-in is slower: roughly 70–80 per hour.
Most events see 60–70% of attendees arrive within the first 90 minutes. Use this formula:
Kiosks needed = (Total attendees x 0.7) / (100 check-ins/hour x 1.5 hours)
Examples:
| Total Attendees | Peak Arrivals (70%) | Kiosks Needed | Max Wait Time |
|---|---|---|---|
| 200 | 140 | 1–2 | Under 2 min |
| 500 | 350 | 3–4 | Under 3 min |
| 1,000 | 700 | 5–6 | Under 3 min |
| 3,000 | 2,100 | 14–16 | Under 3 min |
| 5,000 | 3,500 | 24–26 | Under 3 min |
Always add 1–2 extra kiosks beyond the calculated number. Equipment fails, printers jam, and having a spare prevents a single point of failure from creating a bottleneck.
Physical Setup Tips
The physical layout of your kiosk area affects throughput as much as the technology itself.
Power
- Each kiosk station needs 2–3 power outlets: one for the iPad (or its stand with charging), one for the printer, and one spare for a hotspot or backup charger.
- Use surge protectors with long cords. Venue outlets are never where you need them.
- Tape down all cables with gaffer tape (not duct tape—gaffer tape removes cleanly). Run cables along walls or under table edges, never across walkways.
Cable Management
- Use Velcro cable ties to bundle cables behind/under the kiosk station.
- If using wired printers, route the USB or Ethernet cable through the stand's cable channel (most quality stands have one).
- Label every cable at both ends. When something disconnects at 8am and 400 people are arriving, you need to know which cable goes where instantly.
Signage
- Place a sign above or behind each kiosk: "Self Check-In — Scan Your QR Code"
- If attendees need a QR code, post clear instructions: "Open your confirmation email and show the QR code to the scanner"
- Use simple step-by-step signs: "1. Scan QR code -> 2. Confirm your name -> 3. Take your badge"
- For multi-kiosk setups, consider overhead directional signage so attendees can see available kiosks from the back of the queue.
Placement
- Position kiosks immediately after the venue entrance—not down a hallway or around a corner. Attendees should see check-in the moment they walk in.
- Leave at least 4 feet between kiosks so attendees don't bump into each other or feel crowded.
- Create a clear flow direction: queue on one side, kiosks in the middle, exit on the other side. Use rope stanchions or signage to guide the flow if the space allows it.
- Position at least one staffed help desk or information point visible from the kiosk area, for attendees who can't find their registration or need manual help.
Troubleshooting Common Issues
Even with thorough preparation, issues arise on-site. Here are the most common problems and their fixes.
"The QR code won't scan"
- Cause: Screen brightness on the attendee's phone is too low, or there's glare.
- Fix: Ask the attendee to increase their screen brightness. If the code still won't scan, use name search as a fallback. On the Micepad kiosk screen, attendees can tap "Search by Name" as an alternative.
"The badge didn't print"
- Cause 1: Printer lost its Bluetooth/WiFi connection. Fix: Power-cycle the printer (off for 10 seconds, back on). It should reconnect automatically.
- Cause 2: Badge stock ran out or jammed. Fix: Open the printer, clear any jammed media, reload badge stock, and close. Print a test badge before sending the next attendee.
- Cause 3: Print queue backed up. Fix: Check the iPad's Bluetooth settings. If the printer shows "Not Connected," remove and re-pair it.
"Attendee not found in the system"
- Cause 1: Attendee registered after the last data import. Fix: If you have connectivity, sync the latest attendee list. In Micepad, pull down on the attendee list to refresh.
- Cause 2: Attendee's name is misspelled or they registered under a different name. Fix: Search by email address instead of name.
- Cause 3: Attendee is a genuine walk-in. Fix: If walk-in registration is enabled, register them on the spot. Micepad's walk-in feature lets you add name, email, and company and immediately print a badge.
"The iPad screen is frozen"
- Fix: Force-restart the iPad (press and quickly release Volume Up, press and quickly release Volume Down, then press and hold the Top button until the Apple logo appears). Reopen the check-in app and re-enable Guided Access. Total downtime: about 60 seconds.
"WiFi is down"
- Fix: Switch to your backup cellular hotspot. If that's also unavailable, confirm that offline mode is active. In Micepad, check-in continues working without any network connection—the full attendee list is cached locally.
Self-service kiosks aren't complicated, but they do require methodical setup. The difference between a smooth kiosk experience and a frustrating one almost always comes down to preparation: testing the hardware, planning the layout, and having a fallback for every failure scenario. Follow this guide, and your attendees will check in and grab their badges in under 15 seconds—without needing any help at all.
Micepad Team
Micepad - Enterprise Event Management Software